Background/Motivation
I have wanted to move from 2 machines to a single machine for my general NAS+Plex setup.
The tight coupling of these two machines meant that there was an opportunity to combine them into one machine and get various wins. The biggest win for me was less headache/management. We live in an area with (relative) unreliable power and whenever the power went out longer than the UPS would survive, I found myself having to do the order of operations on booting the NAS, waiting 10 minutes, and booting the HP290. This happens about once a month (lots of construction in my area + storms. It sucks!). The next thing was managing an operating system just for Plex, remoting VNCing to update Plex. I had Portainer running on this machine for Tdarr and could/should have moved Plex to a docker sooner to get easier remote management but I had not. I had also continued to have intermittent issues with NFS mounts and stale file handlers (would happen 1-2 times a month). I’ve written before that you can go into Unraid → Global Shares Settings and switch Tunables Hard Links to No and it should resolve things. I did this and still had some issues now and then. It could have been unrelated to Unraid. But the issues were still happening. It made sense to combine the two machines.
Some other benefits
- Have some fun building a new system

- Go modern while the prices were approachable and I could reuse some parts I already had
- Lower the power footprint (the new server idles around 160w, which is around 30-40w lower than the two machines combined at idle. I’ll keep an eye on day-to-day load now that the new server is running.)
- Lower the heat footprint (which may serve my ultimate goal of moving this box into a smaller space in our home)
The strategy of my migration plan was to change out components on my working build, step by step. I completed the full migration over a 2 week period starting with Plex. The HP290 was decommissioned on day 1 of the 2-week migration. I’ll walk through the steps below and share some thoughts on each step.
Going from
My Unraid Machine
- Supermicro 846 Chassis with many spinners in the bays
- A single e5-2650v2 CPU
- X9DRD-7LN4F-JBOD
- Noctua CPU Cooler
- 32GB DDR3 Ram
- X9DRD LN4F JBOD Motherboard w/ built-in LSI 2308 SAS
- 10GB SFP+ Intel X520 Add-on card
- 3.2TB NVMe PCIe add-on card/drive general cache
- 200GB SAS SSD (on the backplane) for Appdata
My HP290 QuickSync Box
- Intel 8th gen i5-8400
- 12GB DDR4
- 256GB NVMe (Plex + OS)
- 512GB SSD (trashy drive for transcoding and swap)
To an All-in-one
All-in-One Machine
-
Intel 10th Gen i7-10700
- At the time of the upgrade, price was $290 (latest seen around $200)
-
ASUS Prime Z590-A LGA 1200
- At the time of the upgrade, price was $210 (latest seen around $185)
- 64GB (2x32GB) G.Skill Ripjaws V DDR4-3600 32Gx2 CL18-22-22-42
- Purchased off of Hardwareswap Reddit for $150 shipped (thanks @gimpy)
- I don’t think this ram amount is necessary. 16-32GB is plenty even with a VM or two. I would expect to pay around $40-80 for ram.
- LSI 9207-8i
- Purchased off of eBay for $38 shipped
- I’ve seen these cheaper. I paid the hurry-up-and-buy tax.
Other misc. parts I had to buy
- CPU 8 Pin Splitter ATX CPU 8 Pin Female to Dual 8(4+4) Pin Male EPS 12V for Motherboard Power Adapter Cable
- ARCTIC MX-4 (incl. Spatula, 4 g) - Premium Performance Thermal Paste
- Noctua NM-i115x-1200, Mounting Kit for Noctua CPU Coolers on Intel’s LGA115x/LGA1200 Platforms
- Supermicro 6-Inch 16Pin Front Control Split Cable (CBL-0084L)
The Migration
Migrate Plex from the HP290 to Unraid
I lost QuickSync in the process but I had long wanted to see how Plex and the e5-2650v2 held up to normal-ish usage without any hardware accelerated transcoding. And you know what? The biggest learning was that it handled it pretty well. I was surprised but also inexperienced because I had always run a QuickSync box for Plex so I never really knew first-hand the requirements for Plex’s Software-based transcoding. For a week+ Plex ran very well as a Docker container in Unraid.
- [] Shut down, backup Plex into a compressed file - store on Mac mini and on the Unraid array
- [] Install Plex docker on Unraid
- [] Restore Plex backup into docker’s app data
I did have issues with untarring a large file on an Unraid share and getting errors about directory names changing during extraction. Ultimately, I pulled all the Plex data over to another machine, zipped it, and then unzipped it into the Unraid share and that worked fine. (I lost a few hours to this)
Intermission: Backup Up All The Things
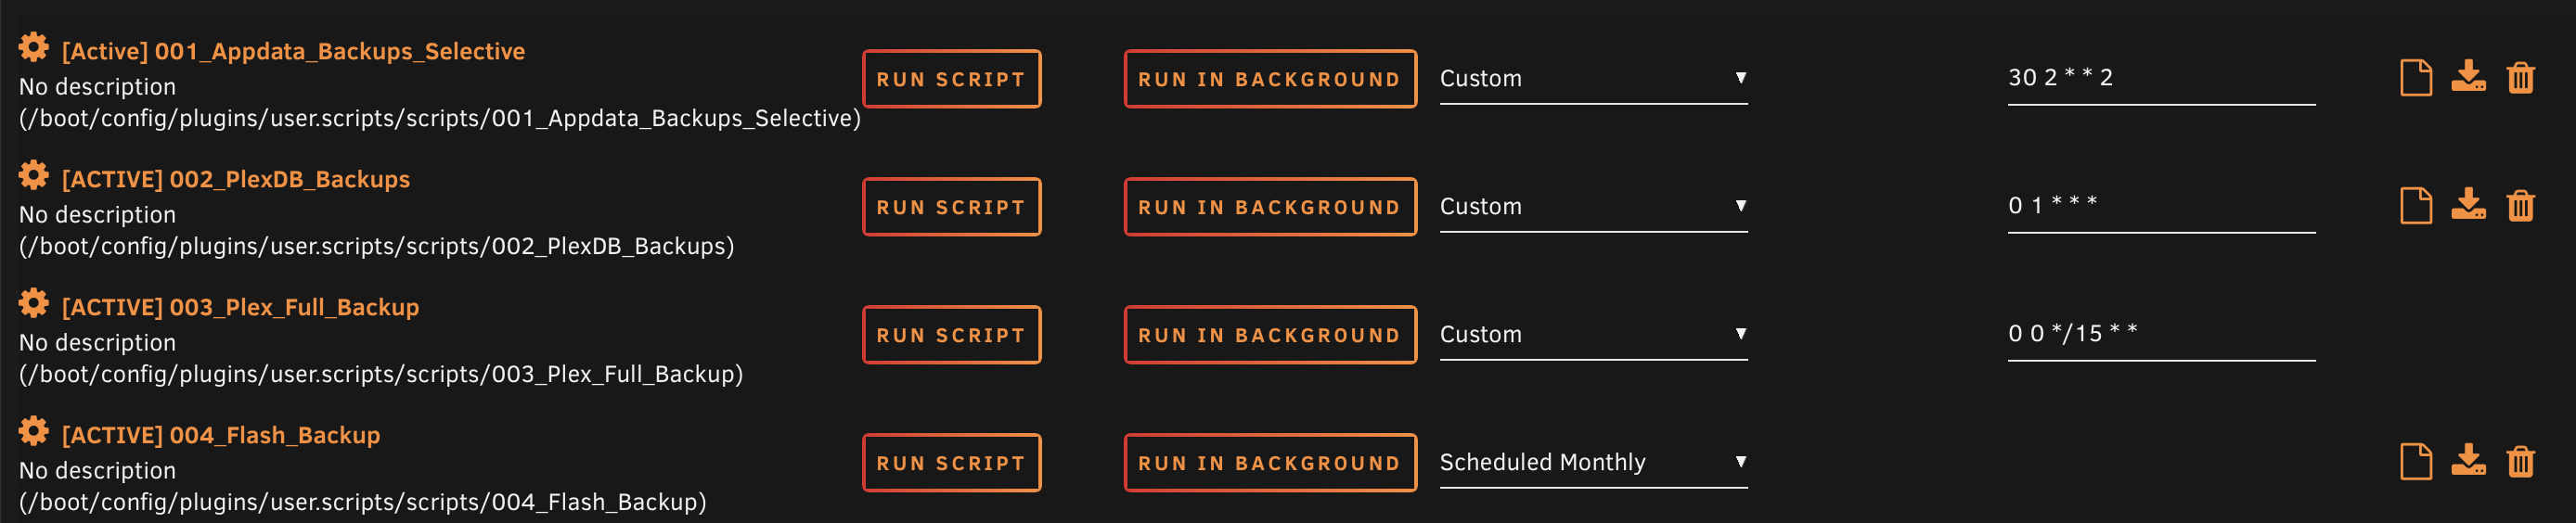
I had never backed up Plex on the HP290 but now that I had it running in Unraid it felt like this was a good time to start backing up Plex. After all, I have a fairly robust backup system in place. Enter Spart’s Unraid Scripts. Spartacus is one of our most knowledgeable community members and has written scripts specific to Unraid for backing up app data, Unraid’s Flash drive, and Plex. All are now implemented as User Scripts and running at various intervals. Prior to this, I was running a monthly, manual Flash backup process and then on a weekly basis relying on the popular Plug-in CA Backup / Restore Appdata. Spart’s scripts are great because they backup a single Docker at a time and don’t require you to shut down all of Docker as the popular Unraid Plug-in does.
Migrate to an HBA card
My motherboard, the legit X9DRD-7LN4F-JBOD, had a built-in 2308 LSI chipset in IT mode. I needed to replace it with a standalone HBA. I had a 9211-8i I could flash to IT mode and use.
- [] Flash HBA with p20 firmware in IT mode
- [] Test HBA in existing NAS and ensure drives work with new HBA
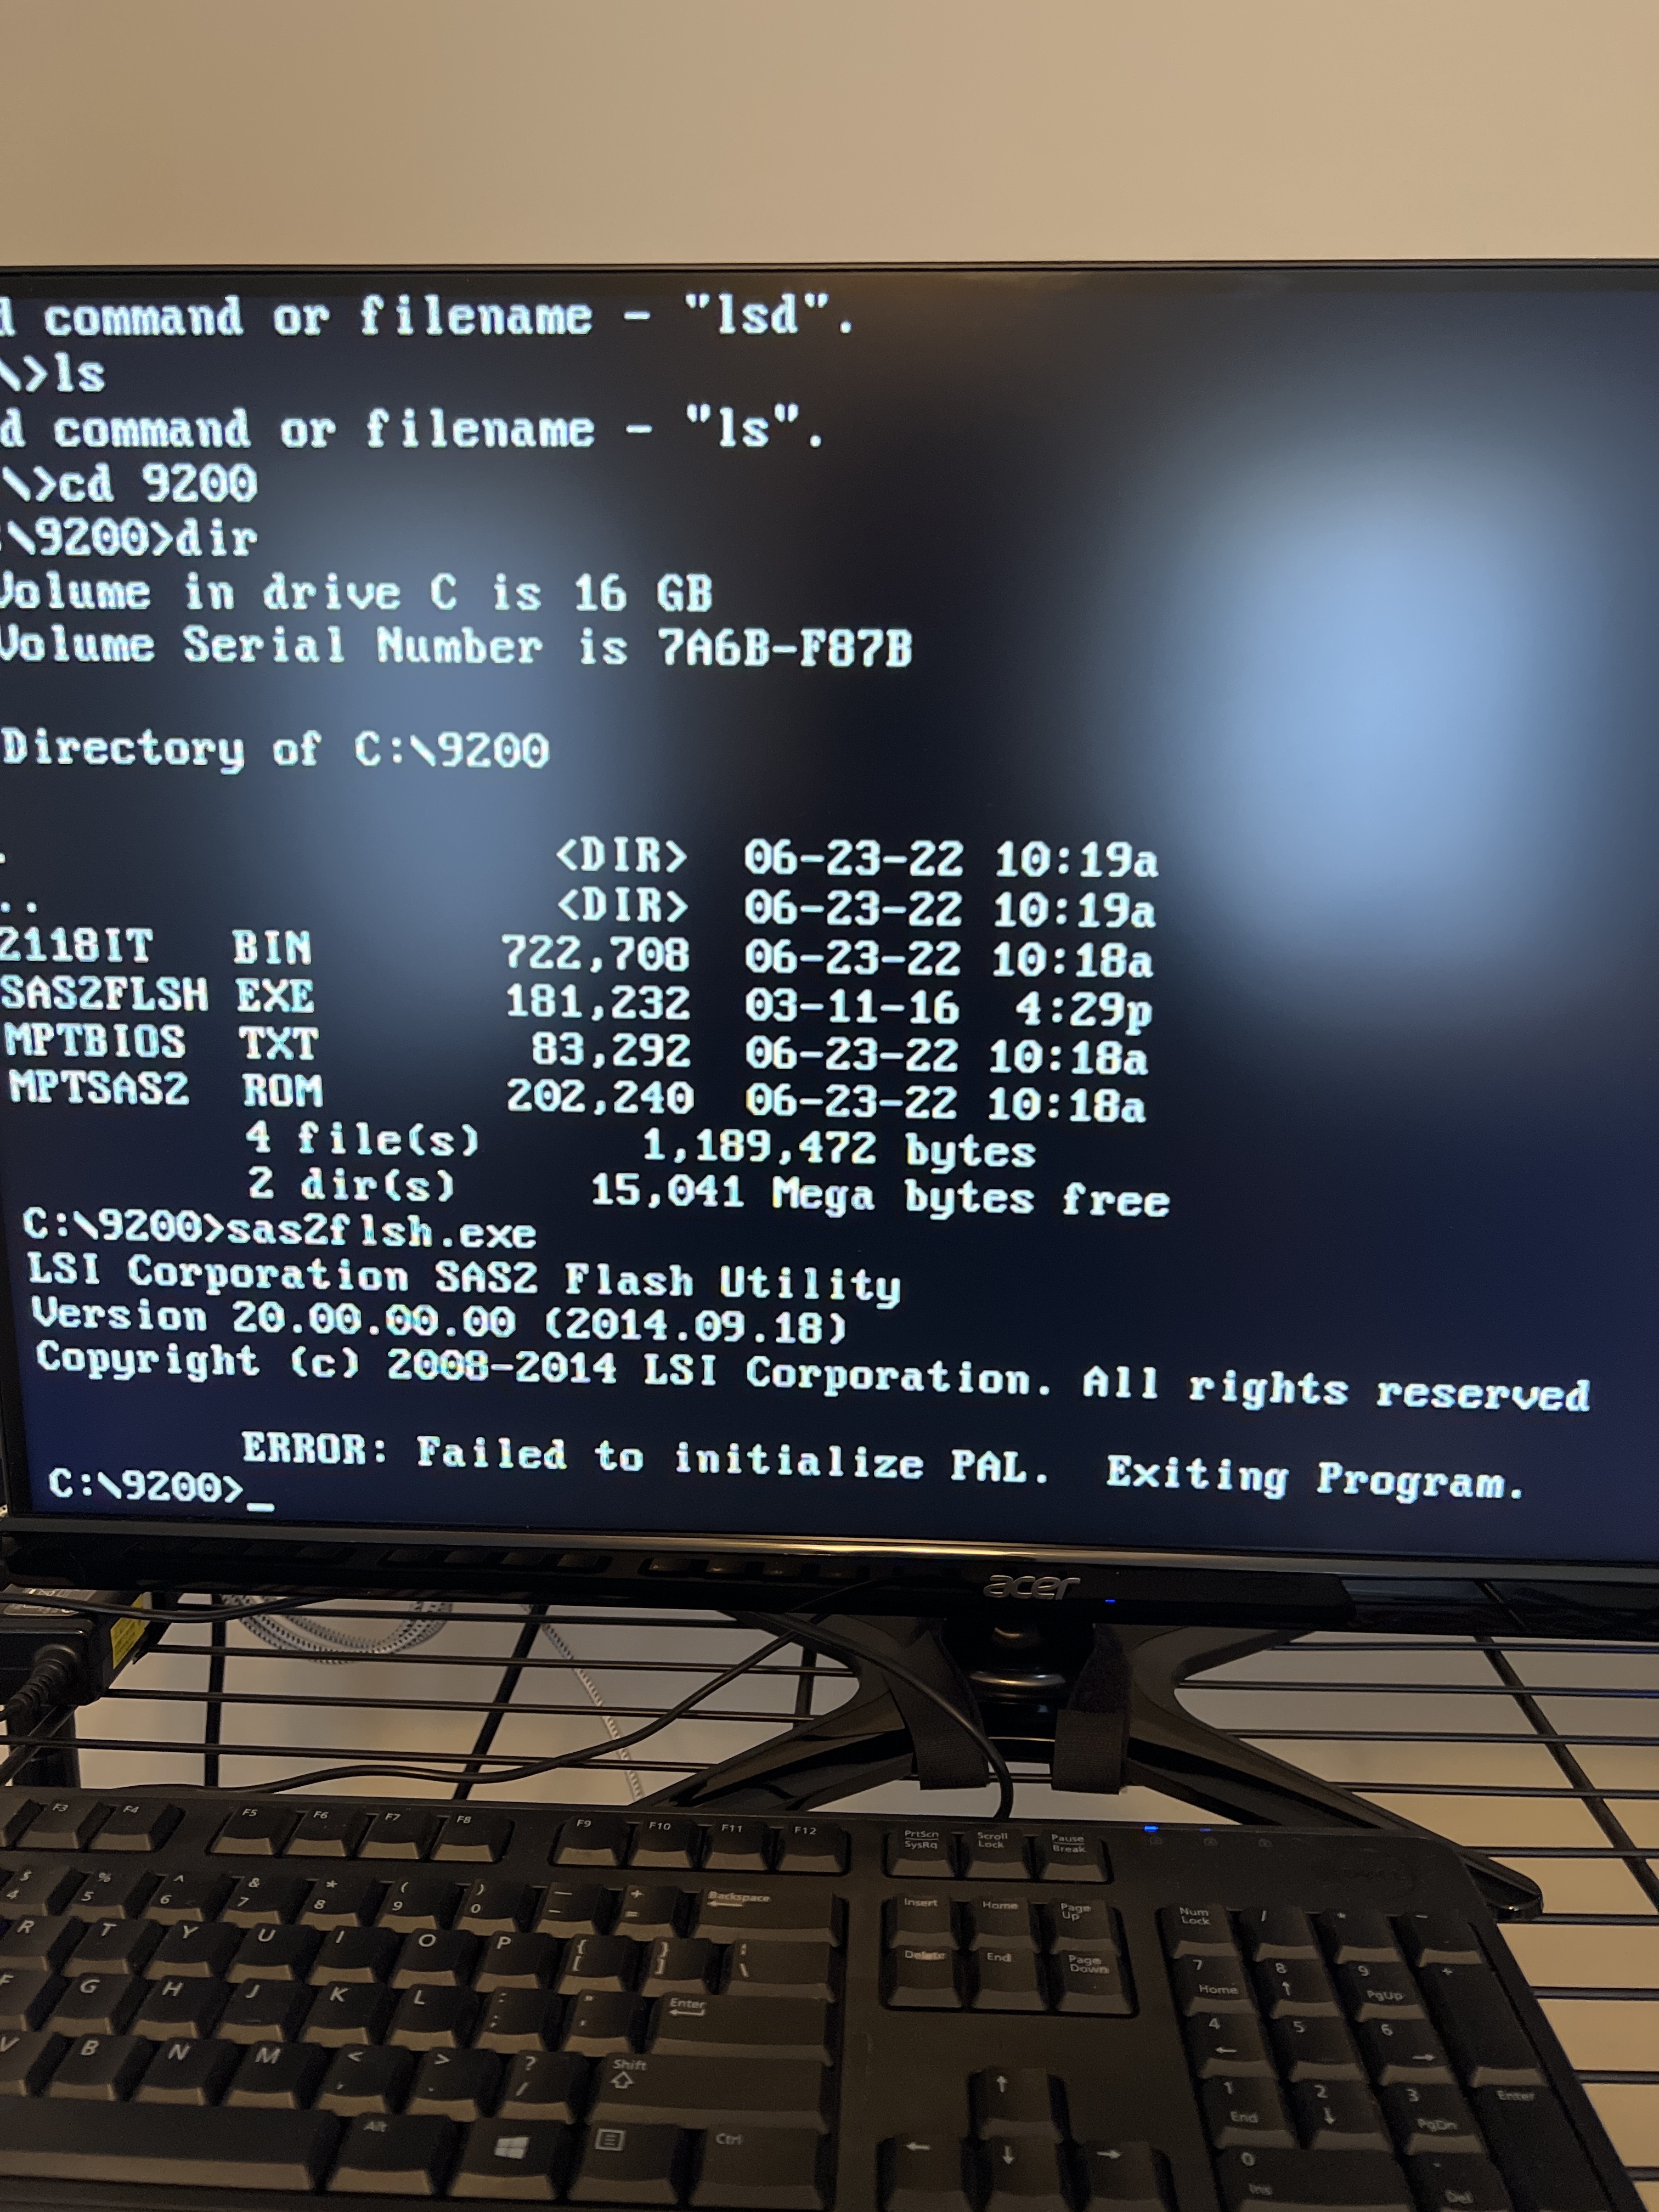
I had an old legacy boot FreeDOS thumb drive I kept trying to use. The motherboards I was trying to boot from would not work with the legacy drive and were giving PAL errors when using the LSI firmware tool. Reading more about that, I needed to switch to UEFI. I also did not understand how to use the UEFI command prompt (learning new things with every change). Ultimately lost 2 hours to banging my head before I found a good tutorial. Looking back, I think my original thumb drive would have worked had I known more about UEFI.
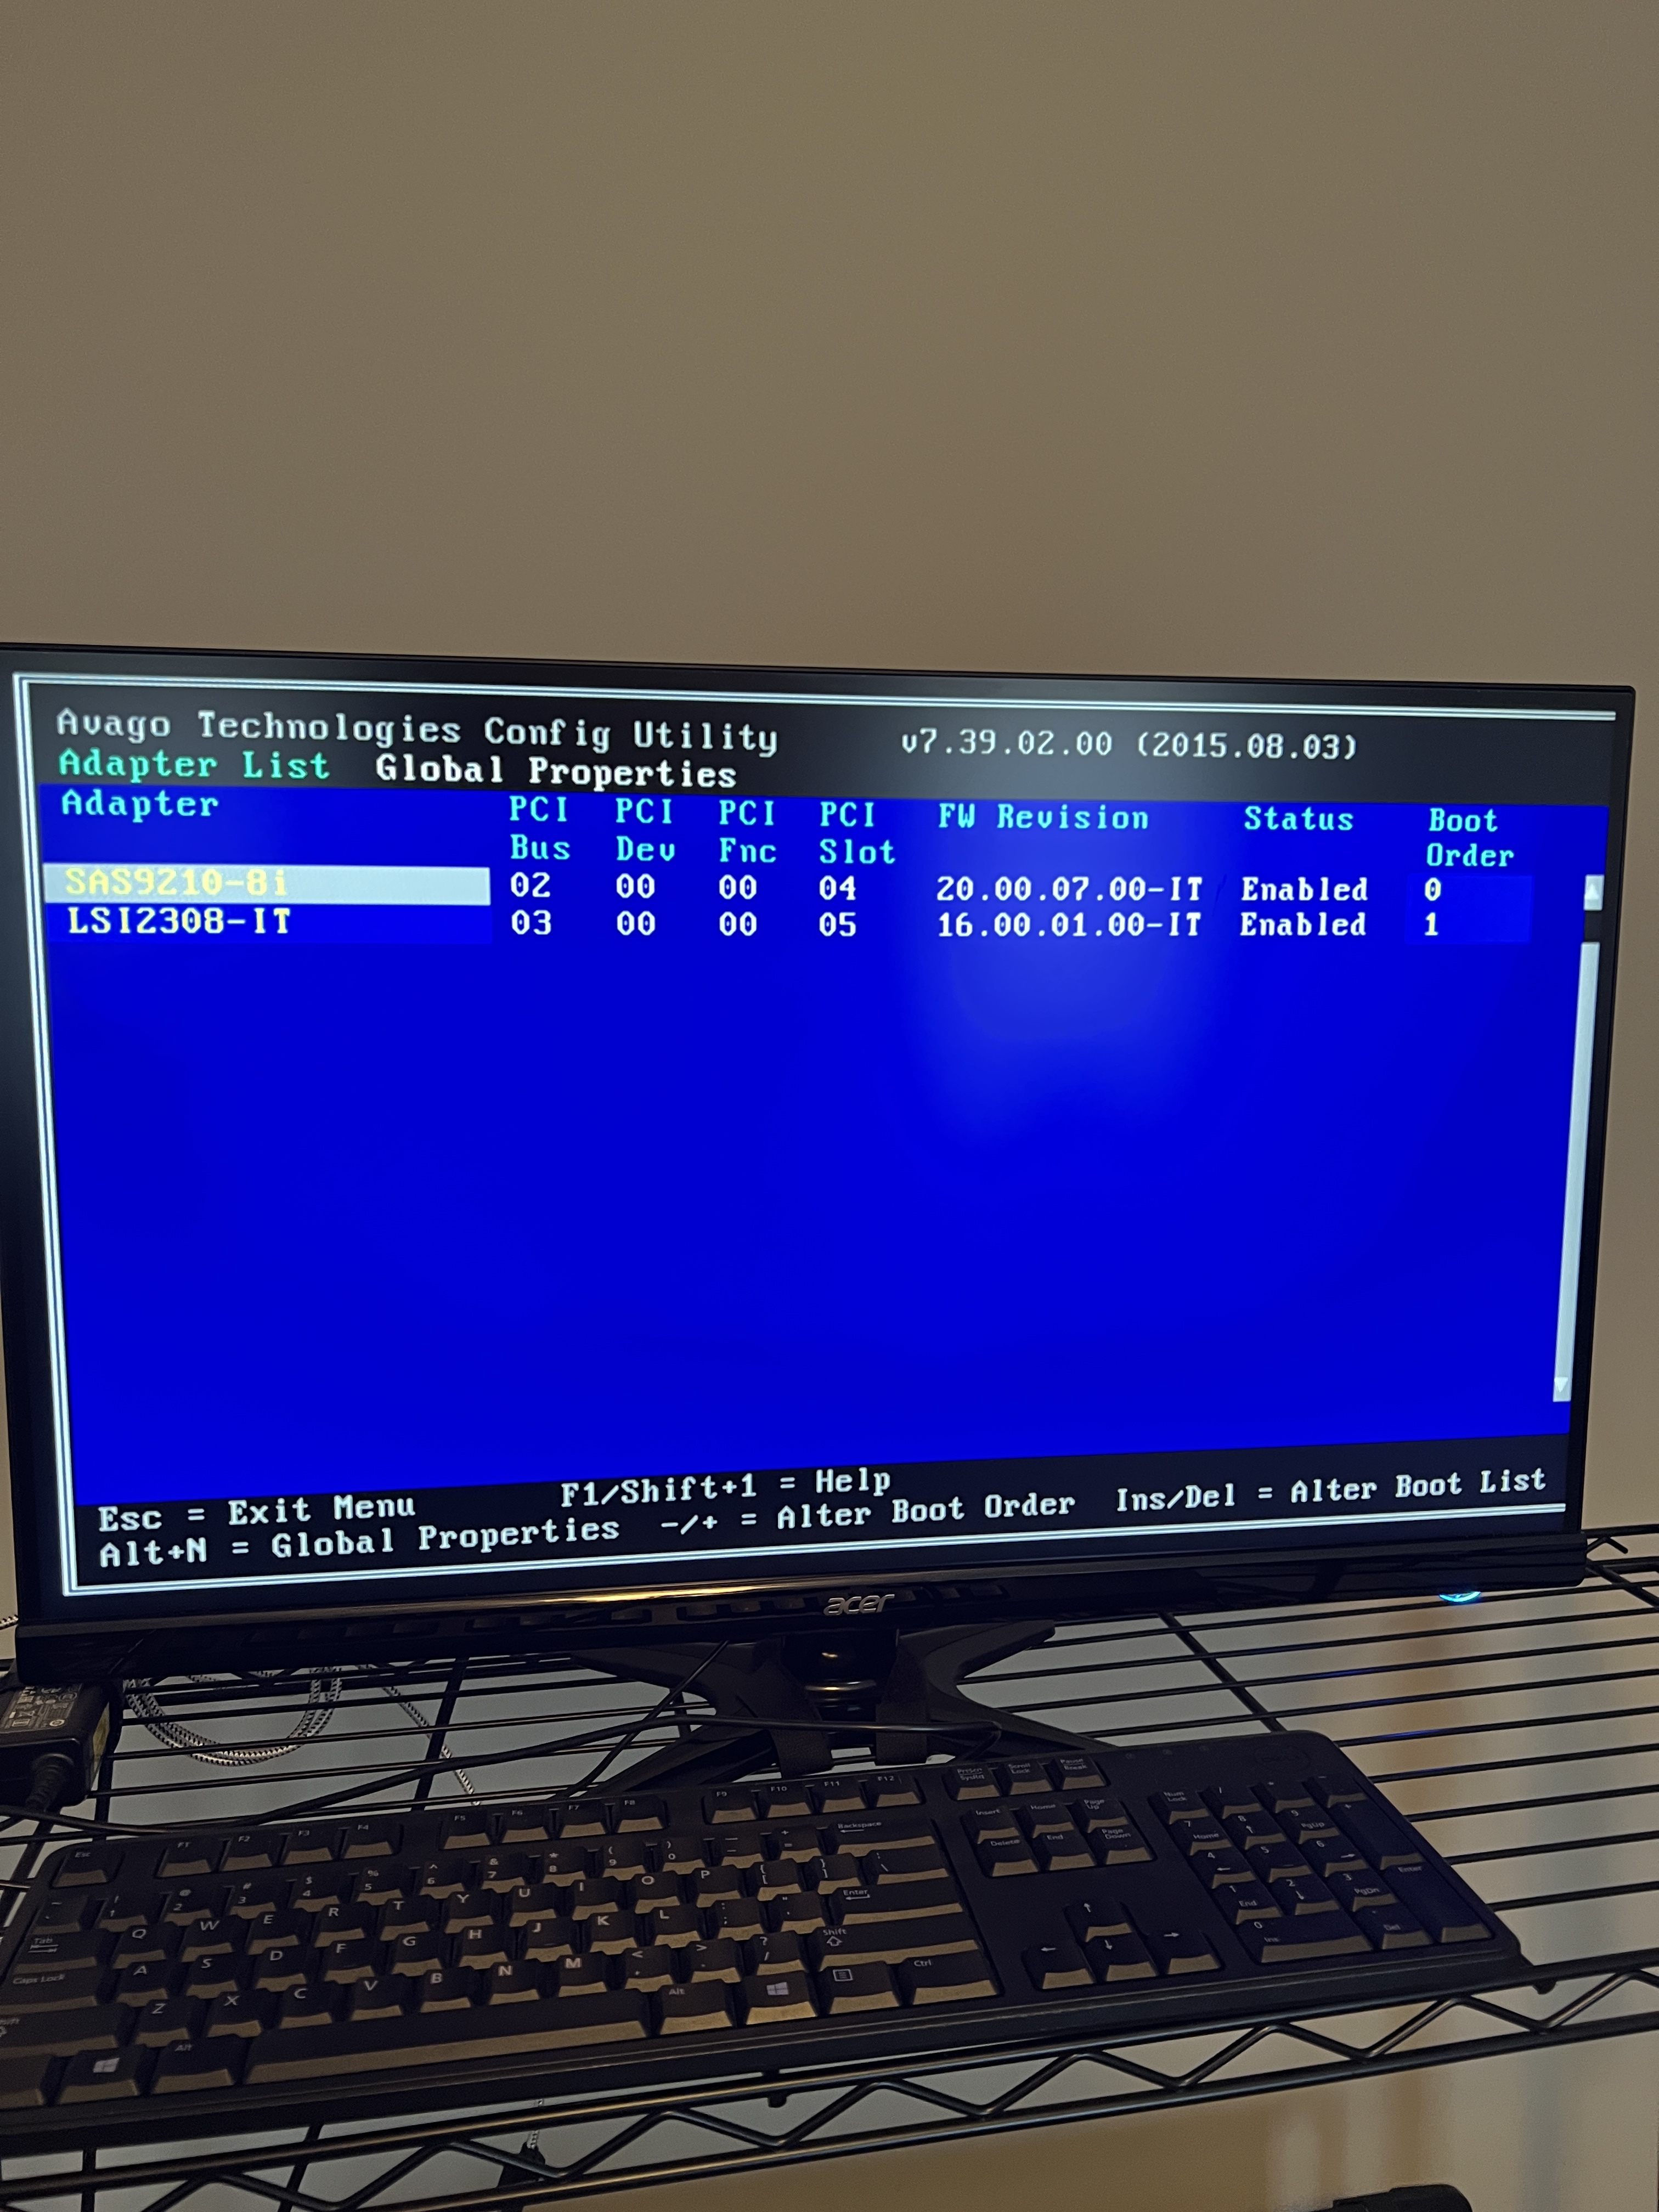
When I ran into issues flashing, I jumped over to eBay to order a 9207-8i from eBay that was pre-flashed and was PCIe 3.0. The 9207 also uses the 2308 chipset (which is what I was coming from). Despite ultimately getting the 9211 (PCIe 2.0) working, I switched to the 9207. I am sure the 9211 would have been fine but I wanted to stay on the 2308 chipset given I do sometimes throw SSDs into my backplane and those benefit from increased bandwidth. I also did not want to ‘downgrade’ any component in my upgrade…
Build Day (Saturday)
Once I had all of the right parts, I did the entire build in a single day. I started around 1 PM CST and completed it around 2 AM CST. Some operations like switching a cache drive take time to move app data back and forth from the array to the new cache drive. I also had a lot of learning to do about Consumer motherboards and overclocking settings (and how to turn them off given they don’t benefit my use case). In past NAS upgrades, I would say a few hours tops. There were a lot of changes here despite my best efforts to frontload.
Test newly purchased components (mobo/cpu/ram)
- [] Setup new motherobard/cpu/ram on a test bench. Boot and ensure everything works.
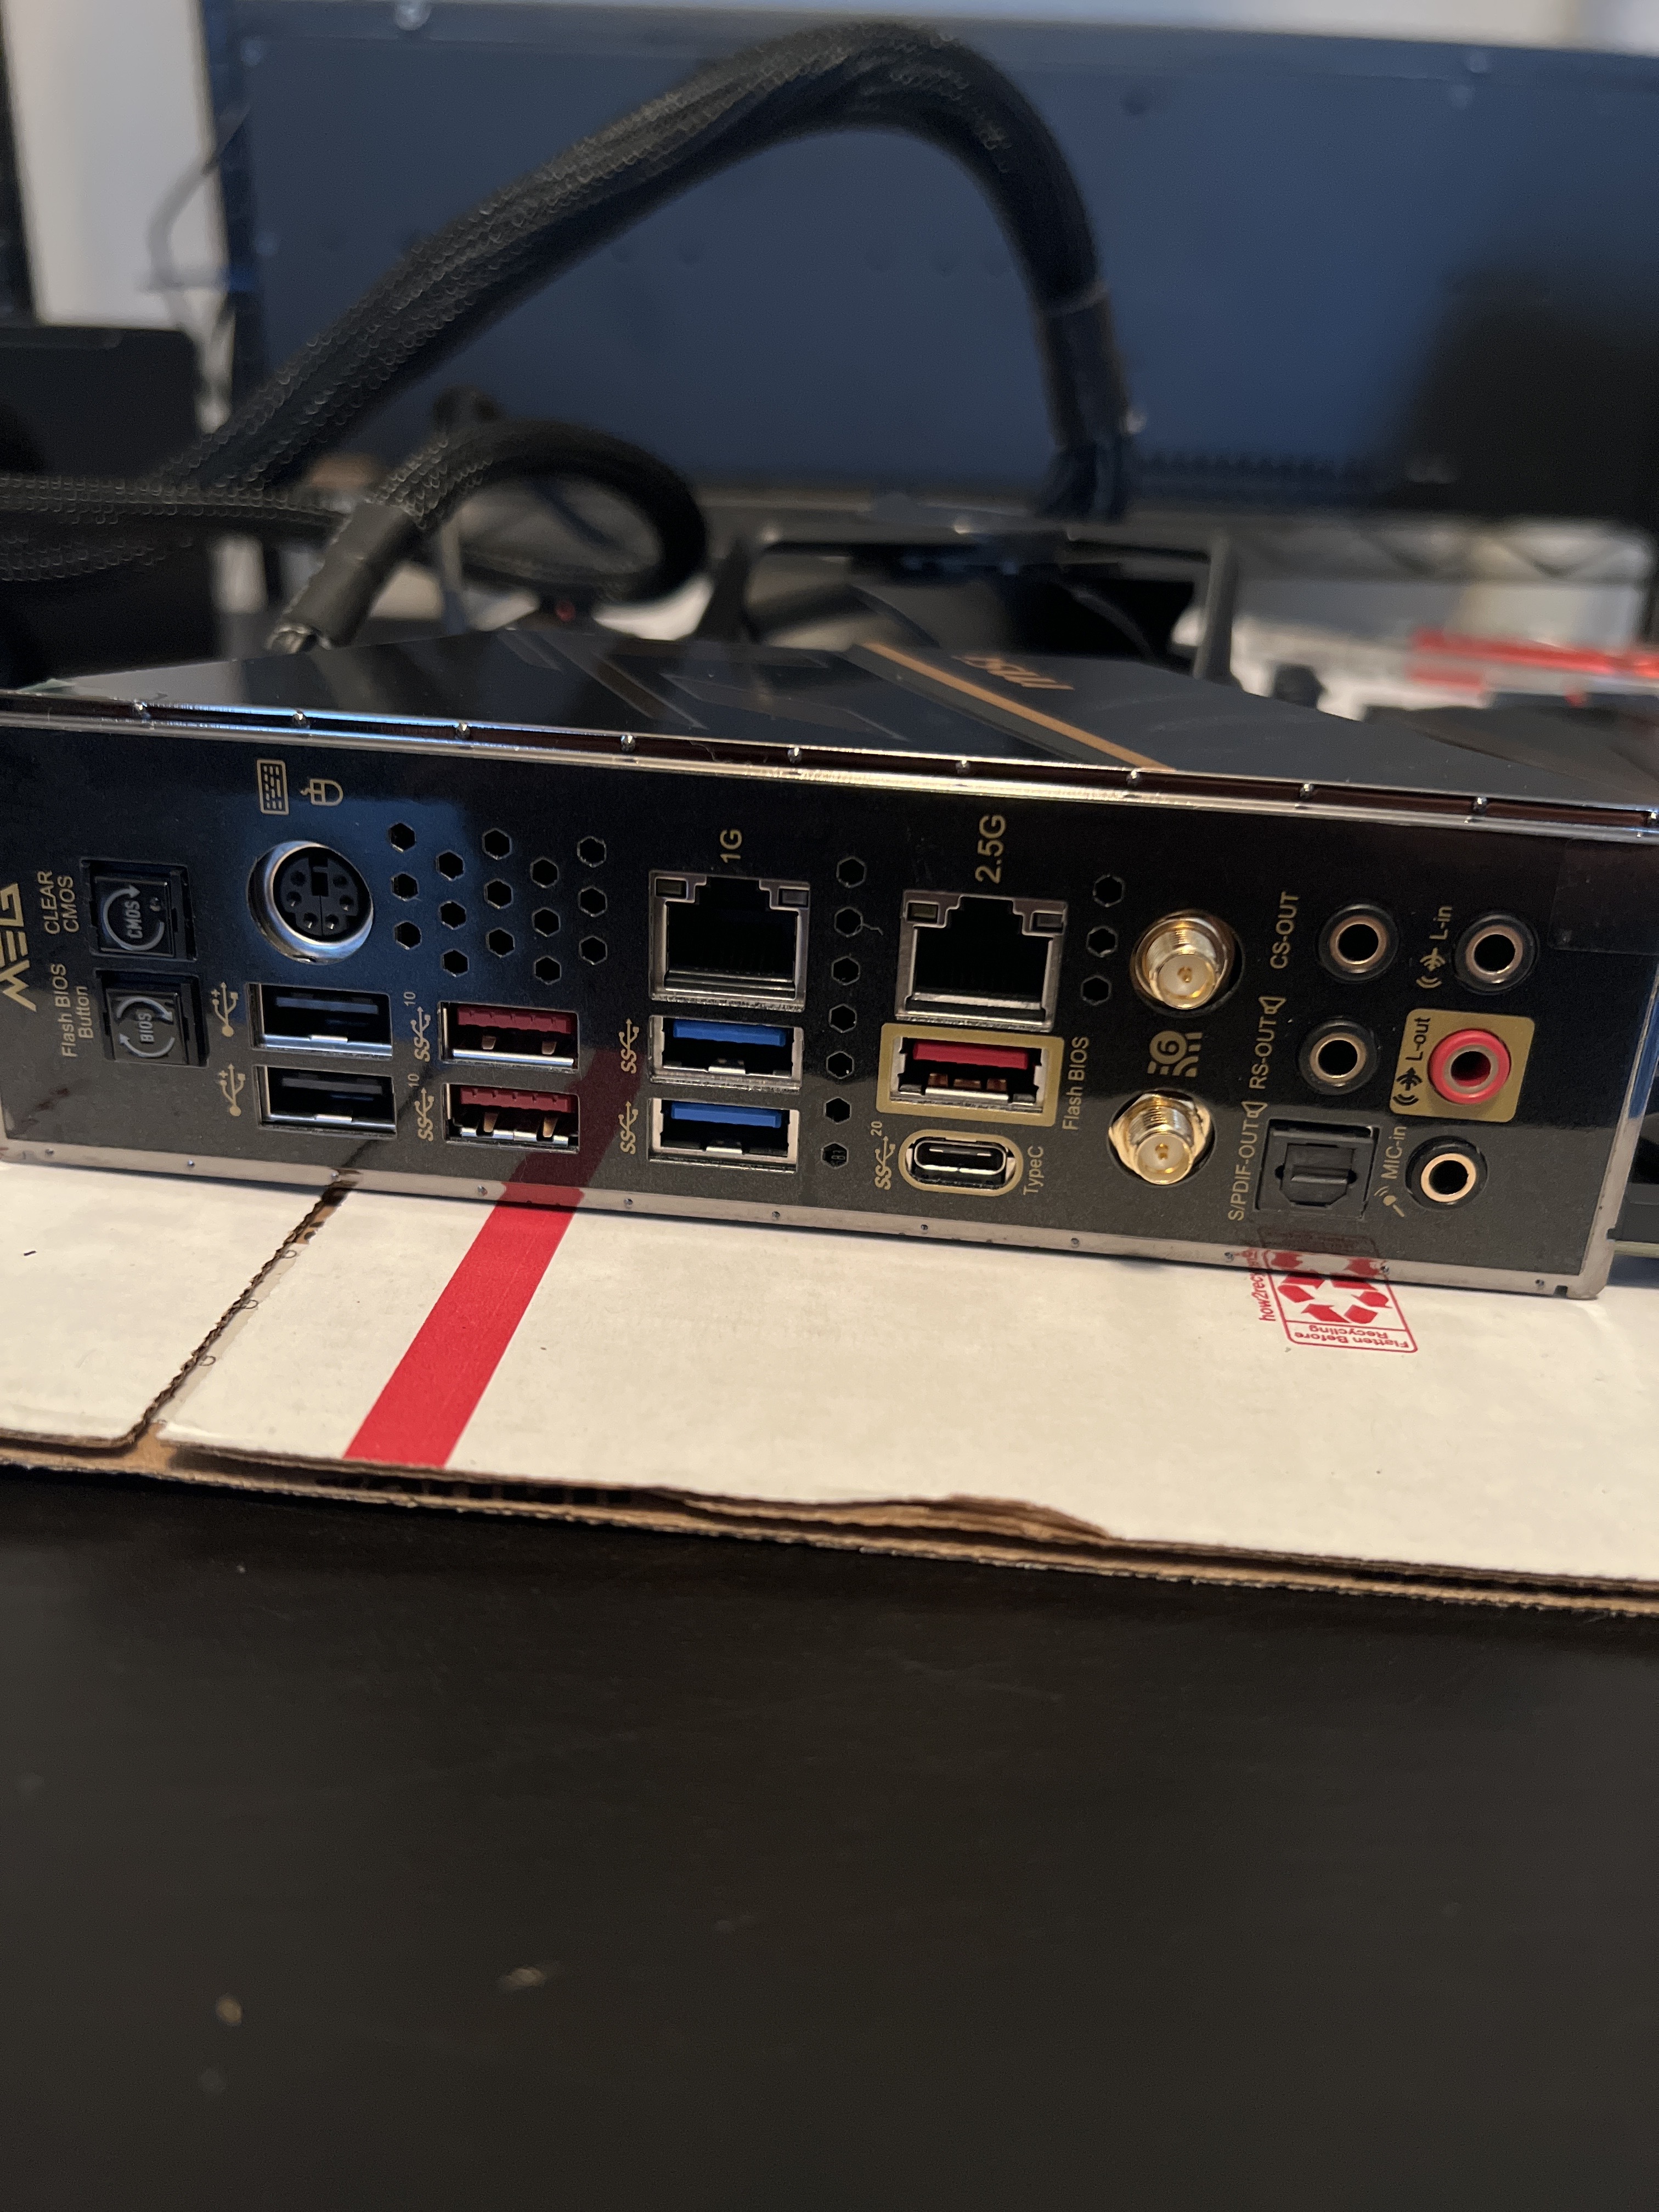
Thursday a MSI MEG Z490 ACE motherboard arrived and after spending an hour setting up the test bench, I realized the board did not have HDMI. I was so focused on PCIe slots and other features. This is important for me for having local access to the machine as I won’t have a video card in the setup. I bought the ASUS Prime Z590-A immediately and it arrived on Saturday. The 590 was nearly $100 cheaper at the time of purchasing, I suspect due to no Wifi6 and some other features. But one of the big benefits was an Intel network chipset (the 490 was RealTek). Having learned my lesson with the 490, I studied the manual for the 590 right after ordering it and I am glad I did: it stated it needed more power than my current board and that led me to buy the 8-pin splitter which I absolutely did end up needing! RTFM!
A 6-pack of these Darlin’s helped Build Day go smooth.
Swap X9 stack with 10th Gen stack
- [] Final Backup of all Unraid things store both on Unraid array and on Mac Mini
- [] Swap hardware and boot to BIOS to check all looks right
- I also used this time to swap in the 9207-8i HBA bought from eBay. It was pre-flashed and I felt confident enough to give that a try, knowing I had my 9211 handy.
- [] Boot into Unraid
The physical migration was pretty smooth. I adjusted the standoffs in the chassis. The Supermicro 846 has 2 8-Pin power cables and I used both; splitting the second one into 4-Pin to deliver the power the board wanted. I ran into issues where the motherboard would not boot from Unraid’s USB thumb drive. Squid on the Unraid forums saved the day. I removed the
~ from the EFI folder name on the thumb drive and everything booted fine.
Something I found pretty consistent in this process was to use variations of motherboard models/chipsets (540, 550, 490, 590) to find posts on Reddit and Unraid’s forums. A lot of these boards have similar chipsets and others who are modernizing their stack run into similar issues.
BIOS Settings
After the migration, I had some BIOS work to do. One of the huge features I was going to lose out on going with this new motherboard was IPMI. Friends in the ReelTalk community made some suggested edits:
- [] Enable Wake on Lan
- [] Enable scheduled boot (this was not an option for my BIOS but it was for my HP290 which was cool to learn about)
- [] Restart on power loss
During the time running Unraid in between these BIOS sessions, I noticed I could not get a CPU temperature reading or fan readings. I was running Unraid 6.9.2 and began my Google searching. I stumbled across a few posts, one of them by Squid, again, on Multi-Core Enhancements which led me down a path of learning about Asus-specific BIOS settings and overclocking. I ultimately disabled many of these “AI” features in favor of less black magic. These gaming boards are often designed for overclockers and in Asus’ case, it comes with an assumption.
So what about the temps? Some forum posts led me to think I needed to upgrade to a more recent Unraid. I did upgrade to Unraid 6.10.3 but that did not solve my CPU temperature reporting. After the upgrade, in the Dynamix Temp plug-in, detecting the proper drivers and loading the drivers did not yield any success. What did? In the process of starting a new support thread on the Unraid forums, I went to get my syslog files. I took a scroll through the syslog and stumbled onto 3 lines that felt important:
Jun 25 16:45:12 Chonk kernel: nct6775: Found NCT6798D or compatible chip at 0x2e:0x290 Jun 25 16:45:12 Chonk kernel: ACPI Warning: SystemIO range 0x0000000000000295-0x0000000000000296 conflicts with OpRegion 0x0000000000000290-0x0000000000000299 (\RMTW.SHWM) (20210730/utaddress-204) Jun 25 16:45:12 Chonk kernel: ACPI: OSL: Resource conflict; ACPI support missing from driver?
Ok. NCT6775, that’s the driver I saw on the Dynamic Temp’s plug-in setting page. ACPI? What’s that. Google time. On Unraid’s Reddit, I found a post about motherboard temps and issues and someone in the comments suggested modifying the Unraid boot to include acpi_enforce_resources=lax. To modify this, go to Unraid → Main → Click your Flash USB drive → down below on this page you’ll find the place to modify this line. For me, the URL was: http://<unraid_URL>/Main/Settings/Flash?name=flash.
Hey, ACPI. I have backups, let’s give it a try. And it worked. I now had CPU temperatures and fan readings… and Unraid 6.10.3.
Onto the next part of my migration…
QuickSync for Plex
- [] Figure out hardware acceleration on Unraid w/ 10th gen, verify it works by testing a stream that needs transcoding
This was very simple. Spart found an Unraid forum post that Guided me through the process. I did have to modify my boot config file but it was very simple.
Swap Cache SSD
One of the other changes I wanted to make was to drop my 200GB SAS SSD residing on my Supermicro backplane and repurpose the 256GB NVMe I had in the HP290. The new motherboard had an m.2 NVMe slot I could use.
- [] Disable Docker/VMs
- [] Set share to Yes so data moves to array
- [] Replace SSD with NVMe
- [] Set Share to Prefer so data moves back to NVMe
- [] Enable Docker/VMs
- [] Pull the 200GB SAS drive
Pull 10gb Card and use Built-in 2.5gb
The last step was to jump over to pfSense and set up a DHCP reservation for the onboard 2.5Gb Intel NIC’s MAC address. I set it to be the same IP that the 10Gb card had, and the rest of my devices/Dockers expected.
- [] Assign 2.5Gb NIC MAC address in pfSense to Unraid’s IP
- [] Head to Unraid’s Network Settings and make the 2.5Gb eth0 and the 10Gb eth1
- [] Unplug 10Gb, plug in 2.5Gb and reboot
Initially, I pulled the 10Gb card before assigning the 2.5Gb port as eth0. Unraid didn’t like me dropping my eth0 before assigning my new, internal NIC to be eth0 instead of eth1. I opted to nuke my network file and everything worked fine on the next boot and pfSense assigned the right IP to the 2.5Gb NIC. I opted for the lazy approach as I did not have any Network rules – caution for others there.
During this process, I did stumble across some alarming Reddit posts about the Intel 1225-V 2.5Gb NIC that will remain on my list of things to keep an eye on (dropped packets). This article from Intel suggests a firmware update - have not tested. Also read that the issue with the Intel i225-V chipset may just be at speeds >1 Gbps.
12 Hours later / Conclusion (in progress)
It’s still early days in the post-migration world. But things are running. I’ll share other things as I learn them related to this build.
Picture of all of the components that made it through the migration. Plenty of room for expansion.
